This sort of bracelets were to be bought both cheap and not so cheap on every street corner in Paris. I'll admit that I've bought a couple myself. But then I thought that it couldn't be hard to make them myself. In France they got shops that are called La Droguerie (no - it got nothing to do with drugs..) where you can find everything you need to make them. I'm sure stores like that are everywhere. In Norway you can find it in Panduro Hobby etc.
Here is my inspiration, the two of three bracelets that I've bought (the third one was a gift for a friend):
A beige thread with a golden bird and a drop-shaped stone. This was a quite cheap one (maybe about 10 euros), so it's not exactly made of real gold. Today, about three years later, it's almost just as beautiful as when I bought it.
Then I bought a real silver bracelet with the word 'rock' on it (it costed about 40-50 euros I think). Simply love it, I ware it almost every day!
The once I wanted to make myself are though a little bit different, but just as beautiful in my eyes. Here is a step by step recipe how to make them yourself.
First; this is what you need:
1. Thread. Instead of buying fabric and cut them myself, these kind of threads were to be bought (with a per meter price) in a little hobby shop in Lille (city in France) - easier and nicer. They had all kind of wonderful colors and patterns. Now I only regret that I didn't buy a lot more.
2. Charms. Then I bought different kind of cool charms, like the eiffel tower, a peace sign and a head skull. These were a lot cheaper in France then in Norway, so I should have bought a lot more of these as well. I bought some in this bronze/metallic color, and some others in a silver color.
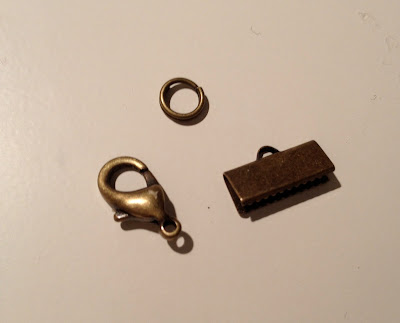
3. A lock. You also need something to lock the bracelet (or, you can of course just make a simple knot if you prefer to, but then it's harder to get it on and off..). There are many different kinds of locks, but I wanted some in the same color as the charm. I also preferred to use a rectangular shaped piece to fasten the lock to the thread (to the right in the picture), because it had exactly the same length as the thread.
4. Glue and a special plier for the lock.
Second; this is what you do:
1. Size up and cut the length of thread that you need for your bracelet.
2. Find the preferred charm (or, it's also possible to make it without any charm if you think that's nicer). Attach it to a ring (of course if the charm doesn't have one already) and then put it on the thread.
3. The last thing to do, is a bit more complicated (but not impossible). On one of the ends of the thread, you attach two rectangular formed pieces of metal (as you saw in the picture above), and then again you fasten a lock to one side and a ring to the other. This to be able to connect the two together. I used some glue on the ends before I pressed the pieces of steel together with the plier. Remember, when you fasten the lock to one side, you should verify that the size is correct, because the lock tends to extend the bracelet with some centimeters.
And that's about it!
Here is the final result. A bracelet with a little Eiffel Tower charm on the bottom, and how the lock is supposed to look like above.
Some exemples of different bracelets that I've made.
My favorite is a silver imitated head skull (I often use it with my 'rock' bracelet that I showed you above).
Hope you liked them! Sorry for some bad explanation, feel free to ask if something wasn't clear:)
ZOUBI ♥


Ingen kommentarer:
Legg inn en kommentar